React Native stack navigation 스택 내비게이션 사용해 화면 전환하기
사용해 본 내비게이션은 stack, bottomtab, drawer 세 가지를 사용해 봤는데
그중 stack 내비게이터를 사용해 보겠습니다.
(공식문서 링크)
React Navigation
reactnavigation.org
리엑트 내비게이션 설치
npm install @react-navigation/stack
버튼을 눌러서 스택내비게이터로 game이라는 화면으로 넘어가게 만들어보겠습니다.
폴더 생성
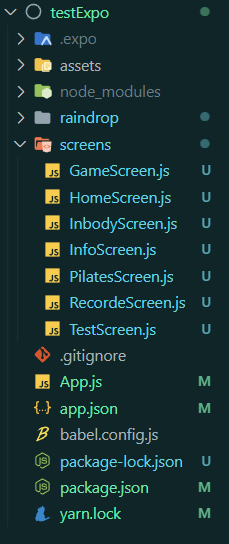
이름도 그럴싸하게 지어서 screens 폴더에 뒀습니다.
원리는 Screen컴포넌트들이 Stack에 의해 name 이 지정되면 navigation 이름을 바꿔줘 화면을 스택을 쌓아 이동하는 방식입니다. stacknavigation을 화면을 이동하면서 props로 navigation을 전달해 화면을 표시해 주는 것입니다.
App.js
1. 사용할 라이브러리에서 import 해주시고, createStackNavigator() 함수로 stack내비게이터를 사용해 줄 준비를 해줍니다.
2. 이동할 화면의 컴포넌트, 스크린을 import 해줍니다.
3. MyStack이라는 함수를 만들어서 6개의 컴포넌트를 등록해 줍니다.
4. 밑에와 같은 형식인데 NavigationContainer 컴포넌트를 App return으로 두고 안에 컴포넌트들은 MyStack이라는 컴포넌트로 따로 묶어줬습니다.
    <NavigationContainer>
       <Stack.Navigator>
       		<Stack.Screen/>
       </Stack.Navigator>
    </NavigationContainer>
import {NavigationContainer} from '@react-navigation/native';
import { createStackNavigator } from '@react-navigation/stack';

import GameScreen from './screens/GameScreen';  //이동해서 보여줄 화면을 import 해주고
import HomeScreen from './screens/HomeScreen';
import TestScreen from './screens/TestScreen';
import InbodyScreen from './screens/InbodyScreen';
import InfoScreen from './screens/InfoScreen';
import PilatesScreen from './screens/PilatesScreen';
import RecordScreen from './screens/RecordeScreen';

const Stack = createStackNavigator();   //stack 네비게이터 사용해줄 준비를한다.
function MyStack () {

  return(
    <Stack.Navigator initialRouteName="Home">
          <Stack.Screen
            name="Home"
            component={HomeScreen}
            options={{
              headerShown: false,
              headerTintColor: "black",
            }}
          />

          <Stack.Screen
          name="Test"
          component={TestScreen}
          options={{
            headerTintColor: "black",
            headerShown: false,
          }}
        />
        <Stack.Screen
          name="Pilates"
          component={PilatesScreen}
          options={{
            headerTintColor: "black",
            headerShown: false,
          }}
        />
        <Stack.Screen
          name="Inbody"
          component={InbodyScreen}
          options={{
            headerTintColor: "black",
            headerShown: false,
          }}
        />
        <Stack.Screen
          name="Info"
          component={InfoScreen}
          options={{
            headerTintColor: "black",
            headerShown: false,
          }}
        />
        <Stack.Screen
          name="Game"
          component={GameScreen}
          options={{
            headerTintColor: "black",
            headerShown: false,
          }}
        />
        <Stack.Screen
          name="Record"
          component={RecordScreen}
          options={{
            headerTintColor: "black",
            headerShown: false,
          }}
        />
    </Stack.Navigator>
  )
}


export default function App() {
  return (
    <NavigationContainer>
      <MyStack/>
    </NavigationContainer>
  );
}
헤더를 전부 꺼줬습니다. (테스트 영상에서는 헤더 켜뒀습니다)
HomeScreen 가볍게 꾸며주기
<TouchableOpacity onPress={() => navigation.navigate("Test")}>
   <Text>1번방</Text>
</TouchableOpacity>
코드를 위와 같이 작성해 주시면 TouchableOpacity 특성에 의해 이름은 전달해 내비게이션의 name을 움직여 해당 컴포넌트를 가져오게 됩니다.
HomeScreen 6개 버튼 정렬한 코드
import { StatusBar } from 'expo-status-bar';
import { StyleSheet, Text, View, Button, TouchableOpacity,SafeAreaView } from 'react-native';
import React,{useEffect, useState} from 'react';
// import Orientation from 'react-native-orientation';


function HomeScreen({navigation } ) {

    return (<View style={{ flex: 1, backgroundColor:'#fff' }}>
        <SafeAreaView style={{flexDirection:'column',flex:1 }} >
        <View style={{flexDirection:'row', flex:1 , }}>
            <View style={styles.buttonContainer}>
                <TouchableOpacity style={styles.NabButton} onPress={() => navigation.navigate("Test")}>
                    <Text>1번방</Text>
                </TouchableOpacity>
            </View>
            <View  style={styles.buttonContainer}>
                <TouchableOpacity style={styles.NabButton} onPress={() => navigation.navigate("Pilates")}>
                    <Text>2번방</Text>
                </TouchableOpacity>
            </View>
            <View  style={styles.buttonContainer}>
                <TouchableOpacity style={styles.NabButton} onPress={() => navigation.navigate("Record")}>
                    <Text>3번방</Text>
                </TouchableOpacity>
            </View>
        </View>
        <View style={{flexDirection:'row',flex:1 }}>
        <View  style={styles.buttonContainer}>
            <TouchableOpacity style={styles.NabButton} onPress={() => navigation.navigate("Game")}>
                <Text>4번방</Text>
            </TouchableOpacity>
            </View>
            <View  style={styles.buttonContainer}>
            <TouchableOpacity style={styles.NabButton} onPress={() => navigation.navigate("Inbody")}>
                <Text>5번방</Text>
            </TouchableOpacity>
            </View>
            <View  style={styles.buttonContainer}>
            <TouchableOpacity style={styles.NabButton} onPress={() => navigation.navigate("Info")}>
                <Text>6번방</Text>
            </TouchableOpacity>
            </View>
        </View>
        </SafeAreaView>
    </View>
    )
}
export default HomeScreen;


const styles = StyleSheet.create({
    NabButton:{
        backgroundColor:"#fff",
        width:280,
        height:280,
    },
    buttonContainer:{
        flex:1 ,
        justifyContent:'center',
        alignItems:'center',
        backgroundColor:'#3598'
    }


})
이동한 곳에는 Home으로 다시 돌아갈 수 있는 버튼을 만들어뒀습니다.
import { StatusBar } from 'expo-status-bar';
import { StyleSheet, Text, View, Button,TouchableOpacity } from 'react-native';
import React from 'react';


function GameScreen({navigation } ) {

    return (<>
        <View style={{ flex: 1, justifyContent: 'center', alignItems: 'center' }}>
            <TouchableOpacity style={styles.NabButton} onPress={() => navigation.navigate("Home")}>
                <Text>HomeScreen으로 이동하기</Text>
            </TouchableOpacity>
        </View>

    </>
    )
}
export default GameScreen;

const styles = StyleSheet.create({
    NabButton:{
        backgroundColor:"#fff",
        width:100,
        height:100,
    },


})
결과 화면
왼쪽 상단 보시면 지정한 component 데로 이름이 나오는 모습입니다.
다음에는 stack tab draw 세 가지 내비게이터 같이 쓰는 법을 알아보겠습니다.